Often times you may notice that the pictures or videos that you post to your Snapchat story are blurry and as an avid Snapchat user, knowing that your followers aren’t seeing the fine quality of your story because Snapchat has made it blurry can be annoying.
Why Do My Snaps Look Blurry When I Post Them
The reason your Snapchat stories are blurry and lose quality once you post them is is either the aspect ratio is incorrect so Snapchat will compress your video. Or the file of the post is over 5MB which means that it will be compressed. To avoid Snapchat ruining the quality of the stories that you post, you need to make sure that you’re uploading pictures with a file size below 5Mb and that you have the correct aspect ratio. If it’s a video, then it’s 1GB or less. All Snapchat stories are constrained within 1080px by 1920px aspect ratio so if you have a video that doesn’t fit this, it’s going to be compressed. Snapchat makes your stories blurry for the best user experience in photo loading, optimizing network connectivity, and taking up minimal space in the phone’s memory and drive. There’s no way to change the upload quality of your stories on Snapchat, it all depends on the quality of your camera. If your Snapchat story is blurry, this is because of Snapchat’s compression feature. All stories uploaded to Snapchat also experience compression and loss in quality so the best way to fix this is to upload high-quality stories so you don’t notice the compression as much.
1. Poor Internet Connection
If you have a poor internet connection, either you’re on mobile data or a slightly slow WiFi network, your Snapchat videos may appear blurry when you post them. If you do have a poor internet connection, then Snapchat will lower the quality of videos if the Internet speed is slow while uploading. If this has happened to you, you’ll notice that your video stories or snaps seem normal to you while uploading, but once the upload is done, the quality goes down. It’s always important to remember to upload on a strong WIFI connection rather than data. Before you do so, make sure to check your internet speed and if it’s not good enough, either chance to data or wait for the stories to stop being low quality.
2. Your Video isn’t Optimized
If you’ve uploaded a video to your Snapchat story, the outcome of a bad quality story would be the result of poor optimization, a side effect of Snapchat stretching the original video you uploaded. If you upload a video that’s too small, or low resolution, Snapchat will then stretch the video to fit. To fix this problem, upload a video that’s of higher quality. You should certainly aim for Snapchat limit of 1 GB for a video. The reason being is that a higher quality video doesn’t suffer from stretching, and shrinking a higher resolution video isn’t going to cause a bad quality story. And don’t go any lower than 1080px by 1920px.
3. Your Network Connection Timed Out
Not an uncommon problem, per say, but certainly a unique issue. You see, when you upload a video, it doesn’t upload all of the data at one time–it does so a little at a time. The strength of your connection helps chern the data faster. If your network times out while you’re still uploading, well, you could end up with a blurry video. The best solution for this is to check your network status. You may have to reboot your equipment, like your modem and router, and simply try again, like so: Here are a few ways to prevent low quality when you upload a picture or video to your story.
How to Fix Blurry Snapchat Videos
1. Keeping the Right Aspect Ratio so Snapchat Doesn’t Blur Your Videos
You need to keep an aspect ratio of 9:16 so that Snapchat doesn’t lower the quality of your video stories. This will make the ideal photo size 1080px by 1920px. This means that your video will fill up the screen so it will keep the quality of the video high. If your video is larger than this and the dimensions are incorrect, Snapchat might reduce the quality of the story so you need to keep within the aspect ratio as well as the file size. To do this with any video you have, it’s best you use Veed.io because this already has a setting that will keep your video at an aspect ratio of 4:5. If you want an aspect ratio of 1:1, then simply using your phone’s setting to crop will allow you to do this.
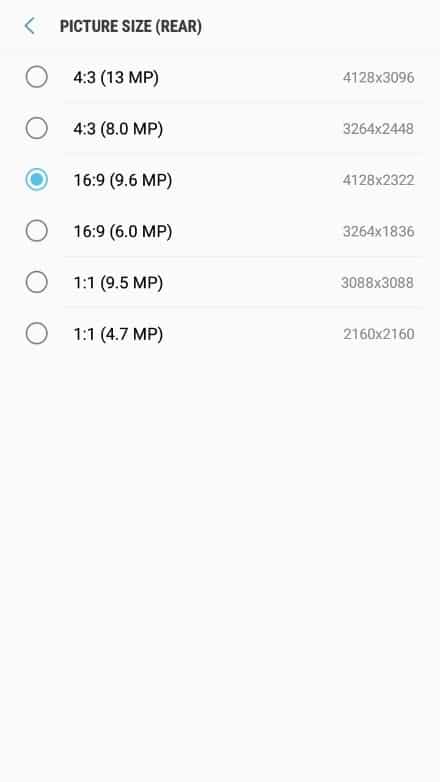
2. Maximize Your Phones Camera Settings to Improve Loss of Quality
The best way to prevent a huge loss of quality in your Snapchat photos is to maximize your phone’s camera quality. Doing this means that you’ll have better quality photos and videos so when you upload them to your Snapchat story and they do lose their quality, the difference wouldn’t be as bad if you didn’t make the quality better initially.
When you adjust the settings and max it out, Snapchat will reduce the size of an image and video to fit its maximum rules. The maximum size of Snapchat video are 1080px so if you take videos from the default camera, utilizing the best resolution will let you keep within the maximum size of videos.
3. Use a High Quality to Keep Story Quality High
Another thing you can do to keep the quality of your stories high is to use a high-quality camera. This could either be a DSL camera that you’re using and this will allow you to keep the quality high straight away. Another great alternative is a new iPhone or Android. These devices have very advanced cameras and this will allow you to keep your story quality high. When you do upload the video to your story, rather than Snapchat making it blurry, the video will lose quality but it will still be of great quality compared to other people’s posts that don’t use high-quality cameras.
4. Don’t Use Your WIFI
If your Snapchat story is low quality, then make sure to use data instead of WIFI. To change to WIFI, simply turn off your WIFI and turn your mobile data on. Usually, mobile data has a more stable Internet connection which means that you’re more likely to have a higher quality story.
5. Use Snapchat’s Camera
If you’re using your native Camera app, you should consider using Snapchat’s default camera app. Although there isn’t much you can do with the default camera of Snapchat, it takes pretty decent videos that are high-res. This follows the previous method’s technique in taking a high-resolution video and the post will just be adjusted upon upload to the platform. Your videos won’t be any less pixelated but you’ll see how they’re going to turn on as soon as you take the video as opposed to when you upload them and feel the huge drop in quality.
6. Don’t Share the Video Before Uploading
If you’re exchanging photos through platforms Facebook Messenger or WhatsApp, there’s a hundred percent chance that the media content gets compressed. Facebook and WhatsApp do this in order to keep the experience smooth and sacrifice some of the content quality of the videos. I know I’m guilty of this because I always send videos through WhatsApp so I didn’t realize that the media gets compressed until I dug into the file directory. Sharing on apps before you post a story on Snapchat will cause initial compression so when you do go to Snapchat and post the already compressed video, then it could come out pixelated due to Snapchat’s further compression. Alternatives to this can be sharing the file through Bluetooth, or uploading it via Google Drive or iCloud.
7. Toggle Off Data Saver
8. Update Snapchat
One way you may be experiencing some poor video quality is if the app version you’re using is outdated. Consider going to Google Play or iTunes App Store and downloading the latest version of Snapchat. The app updates from time to time so you can check back to the app page of Snapchat for the latest version. You can also consider updating your device if you’re using an older unit. Older units have an older version of Android or iOS which may not have the capabilities needed to run a more recent version of the Snapchat app.
9. Uninstall and Re-install Snapchat
If there’s an error within Snapchat that’s causing Snapchat stories to blur, you’ll need to download it and reinstall it. There may be something wrong with Snapchat itself so redownloading it again may clear up the issue. If you want to uninstall Snapchat: When you download it again, go back to the app and see if your stories are blurry.
10. Reset Network Settings
When you reset your network settings, this will fix any network problems that is causing Snapchat videos to have low quality when you upload them to your story. Resetting the network settings clears any setting that relates to a network which could fix the app that’s having issues with your network. When you do this, your settings will go back to how there were when you first had your device. To reset your network settings: Android: A confirmation will pop up, tap on ‘Reset Network Settings’ again to confirm your decision. This will reboot your device and once it’s back on, go back into Snapchat and check if your story still has a bad quality after re-uploading it. iOS:
Conclusion
Luckily there are ways to fix your blurry Snapchat videos such as using the camera app natively or making your native camera is set to the highest quality possible. If every video you send is blurry, or every video you upload to your story is blurry, it can make you come off as a fake account, especially if you don’t have things like a bitmoji and your snap score is relatively low.