Fortunately, you can read our guide on how to turn off superscript in Powerpoint if you would prefer that Powerpoint not apply that formatting on its own.
How to Stop Automatic Superscript in Powerpoint
Our guide continues below with additional information on how to turn off superscript in Powerpoint 2013, including pictures of these steps. Our Powerpoint insert check mark tutorial can show you how to use an interesting font in the application to add various symbols to your slides. Occasionally you will encounter small text that is raised off the baseline in Powerpoint 2013. This text is called superscript, and is commonly found with ordinals, which indicate the relative position of an item in a sequence. An example of an ordinal would be 1st, 2nd, 100th, and so on. Powerpoint 2013 automatically applies superscript to these types of text. While this automatic superscript formatting is helpful in some situations, you might find that you would prefer that it not occur. Our tutorial below will show you the setting that controls the automatic superscript so that you can turn it off if you desire. Google Docs has superscript and subscript options, too. Check out our guide on how to do subscript in Google Docs if you would like to add or remove that type of formatting in the application.
Disabling Automatic Superscript in Powerpoint (Guide with Pictures)
The steps in the guide below are going to change a setting in Powerpoint 2013 that will stop the program from automatically applying superscript when you type ordinals, such as 2nd, 3rd, 4th, etc. This setting is changed at the program level, so it will apply to every presentation or slideshow that you work with in Powerpoint 2013 until you follow these same steps again to re-enable the setting.
Step 1: Open Powerpoint 2013.
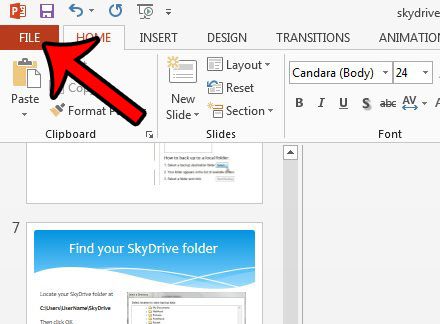
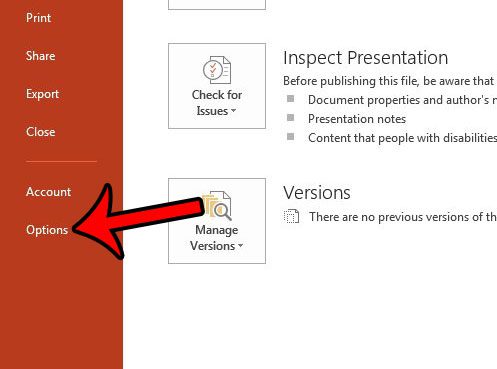
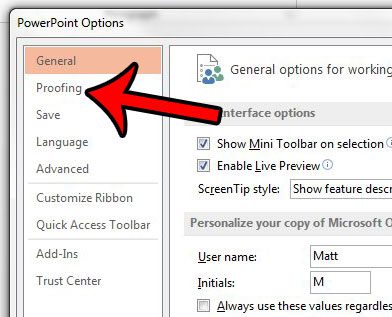
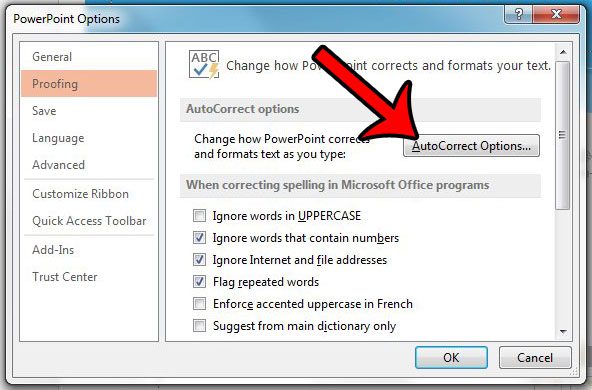
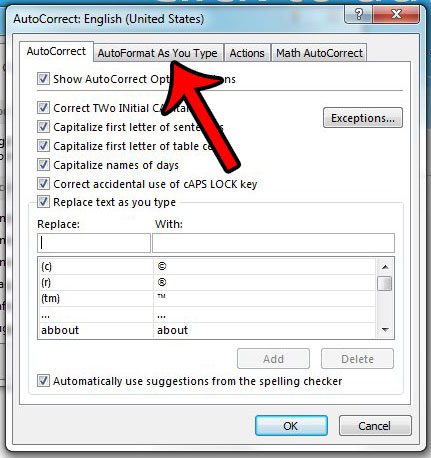
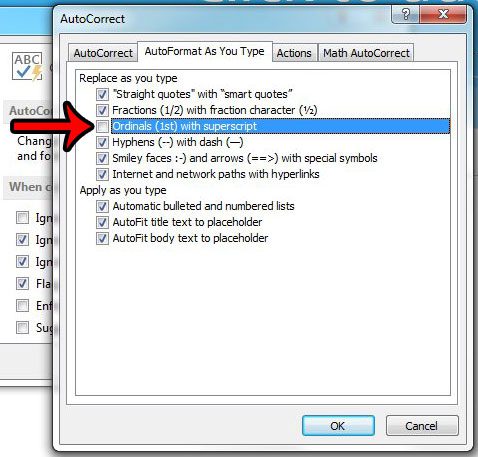
Step 2: Click the File tab at the top-left corner of the window. Step 3: Click Options at the bottom of the column on the left side of the window. This opens a new window titled Powerpoint Options. Step 4: Click the Proofing tab at the left side of the window. Step 5: Click the AutoCorrect Options button. Step 6: Click the AutoFormat As You Type tab at the top of the window. Step 7: Click the box to the left of Ordinals (1st) with superscript to remove the check mark. You can then click the OK button at the bottom of the window to apply your changes. Now that you know how to turn off superscript in Powerpoint you will be able to type text that Powerpoint would otherwise convert to superscript, but keep it in the default text style. Note that changing this setting will not undo any of your existing superscript. It will only prevent it from occurring automatically in the future. You will also be able to select text and manually apply the superscript formatting to it if needed. Are you having difficulty sharing Powerpoint files with other people because the fonts that you use don’t look correct on their computers? Learn more about embedding fonts in Powerpoint slideshows so that your presentations can be viewed as you intended them.
Additional Sources
After receiving his Bachelor’s and Master’s degrees in Computer Science he spent several years working in IT management for small businesses. However, he now works full time writing content online and creating websites. His main writing topics include iPhones, Microsoft Office, Google Apps, Android, and Photoshop, but he has also written about many other tech topics as well. Read his full bio here.
You may opt out at any time. Read our Privacy Policy