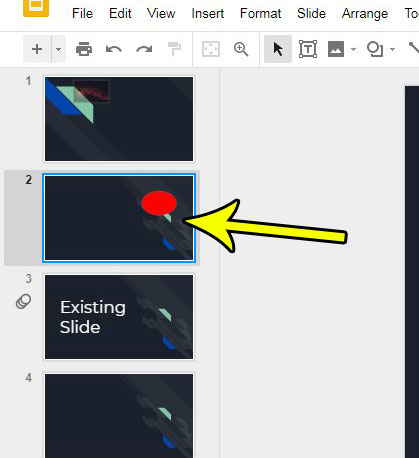
Now that Google Slides is increasing in popularity, many Powerpoint users are trying it out, but wondering where some of their more commonly-used tools and options are located. If you are trying to hide a slide in your presentation, for example, you may be wondering how. Our tutorial below will show you how to hide a slide in Google Slides using just a couple of steps.
How to Skip a Slide in a Google Slides Presentation
Our guide continues below with additional information on hiding slides in Google Slides, including pictures of these steps. Sometimes a presentation that you create will be intended for multiple audiences. While keeping separate presentations for each of these audiences is more convenient if they require slightly different content, it also means that you need to be sure to update similar slides on each of these presentations. That can be confusing and potentially lead to problems. One way around this is to simply have one presentation, and take advantage of a feature in Google Slides that lets you hide slides that aren’t relevant to the current audience. This lets you keep all of your slides in one presentation, and you can simply choose to skip the slides that aren’t relevant to the current audience. Our guide below will show you how to skip, or hide, a slide in Google Slides. Do you want to use one of your existing slides as a template for another one? Our how to duplicate a slide in Google Slides guide can show you how.
How to Skip a Slide in Google Slides (Guide with Pictures)
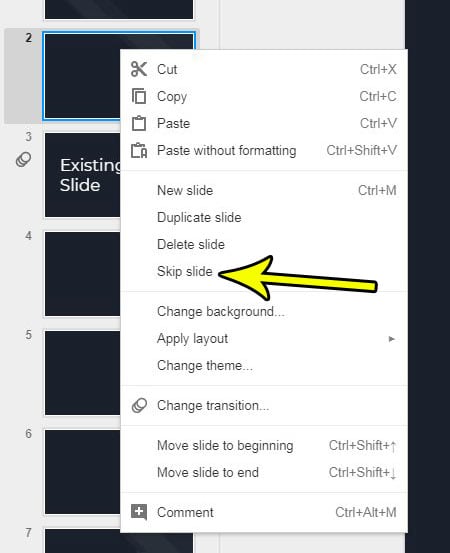
The steps in this article were performed in the desktop version of Google Chrome. Completing these steps will cause Google Slides to skip the selected slide when you are giving a presentation. The slide will still be part of the presentation, and you will be able to edit it or stop skipping it in the future, but a skipped slide will not be displayed when you are presenting. Now that you know how to hide a slide in Google Slides you will be able to use this method in the future when you have a slide in your presentation that you don’t want to show to a particular audience. When you are ready to stop hiding that slide, simply right-click the hidden slide and choose the Skip slide option again.
More Information on How to Hide a Slide in Google Slides
While skipping a slide is effective when you don’t want to show a slide, but you still want to keep it, you may have a slide that you simply don’t need anymore. Find out how to delete a slide in Google Slides and remove it from the presentation entirely. If you are more comfortable using the menu at the top of the screen, then you can also hide a slide by going to Slide > Skip slide. I have found the right-click option to be more convenient, but I know that a lot of people who don’t use right-click in programs often forget that it is an option. If you are intending to use the right-click option to hide slides, then take note of the other options that are available on this menu. For example, you can insert a new slide, duplicate the selected slide, or delete a slide. You can also do things like changing the slide background, applying an existing layout, or changing the theme. If you need to hide more than one slide at a time you can do so by holding down the Ctrl key on your keyboard, clicking each of the slides to hide, then right-clicking on one of the selected slides and choosing the “Skip slides” option. As with the method for hiding single slides, you can also use the Slide > Skip slides option from the top menu. You can tell that a slide is hidden, or that it will be skipped, by the icon that looks like an eye with a diagonal line through it.
Conclusion – How to Hide Slides in Google Slides
Our article above showed you two different methods for when you want to hide a slide in a Google Slides presentation. Whether you are more comfortable right-clicking and performing actions that way, or using the menu at the top of the window, there is a way for you to access the “Skip slide” option. You will need to hold down the Ctrl key on your keyboard, then click each of the slides that you would like to skip during your presentation. Once all of the slides are selected you can right-click on one of them and choose the Skip slide option. If you see an icon that looks like an eye with a diagonal line through it on some of your slides, then that means that you have skipped slides in your presentation. Additionally, depending on your print settings, they might not print either. If you would like ot include those slides in your presentation then you can use the same process that was used to hide them originally. Simply right-click on the hidden slide, which is going to open a slide menu with a bunch of options. You can then click the Skip slide option from the dropdown menu to unhide it. Once you have hidden slides in your slideshow you will be able to present that slideshow without showing the slides that you elected to hide or skip. You can always select a slide and choose the Skip slide option again when you are ready to include the slide in the presentation.
Additional Reading
He specializes in writing content about iPhones, Android devices, Microsoft Office, and many other popular applications and devices. Read his full bio here.


